A Supra-bright Bike Light
by Ross Signal
Once upon a time, as Jeff bicycled home through the Michigan evening gloom, he found, for the umpteenth time, that his AA-cell-powered bike light was again growing hopelessly feeble. A strange, gnawing desire began to grow within him for the ultimate headlamp system: the NightSun. But could the boggling $180-220 price possibly be justified?
Much peculiar behavior ensued. Camping lanterns were bungeed to racks. Mag-lites were duct-taped to helmets. Rechargeable batteries of various types were purchased. Internet Newsgroup denizens were cross-examined. Anything to exorcise the awful idea. Finally Jeff began calling me: Wasn’t there another possibility?
At the end of our epic saga, Jeff had an insanely bright bike-light, one unlike any other. But there were delays and cost overruns of defense-contractor proportions; ultimately we had a new respect for some of those fancy commercial lights. Here¼s the blow-by-blow if you¼re wacky enough to want to try it yourself:
When Jeff called me, I said that it wasn’t immediately crazy to imagine a bright light which would run for 2 or 3 hoursã but to figure it all out, we¼d have use the one, amazing equation which lets you work out nearly anything involving electricity:
Volts x Amps = Watts (or: Watts/Volts = Amps)
Sorry we have to get dirty with the math here. But the watts of a lamp tell you how bright it is, while you select rechargeable batteries by voltage and capacity. Capacity is given in the peculiar unit “amp-hours” (or sometimes, “milliamp-hours,” where 1000mAh = 1Ah).
Looking at the NightSun blurb in a catalog, it said with the 7.5-watt low beam the battery lasted 4.7 hours. (Low and high beams together were 27.5 watts-Yikes!) All the high-end bike lights seem to use tiny halogen reflector spots, the same ones found in store display lighting and yuppie dream homes; I knew these were usually 12 volt lamps.
So it was time to poke the calculator and say OK, that low beam draws a current of 7.5 watts divided by 12 volts, or 0.63 amps. So, the Night Sun battery capacity must be 0.63 amps x 4.7 hours, just shy of 3 amp-hours. It’s easy to find rechargeables with that kind of capacity; we could do this!
“Sealed lead-acid” (a.k.a. “gel-cell”) batteries are the cheapest rechargeables, but they don’t like cold or heavy discharging-none of the high-end bike lights on the market use them. The pro approach is to stick with NiCad (Nickel-Cadmium) cells.
The biggest NiCads easily available are industrial D-size cells, each 4.0 amp-hours. NiCads are only 1.2 volts, compared to the 1.5 volts of regular alkalines (this is why NiCads sometimes seem wimpy as replacements for normal batteries), so a pack of ten D-Cells would provide 12 volts and plenty of capacity. But our first shock was discovering this would cost almost $70. Ay Chihuahua! That’s one reason the NightSun is so expensive.
Fortunately, the All Electronics catalog had a sale, and we got 10 for $50. Do watch out for cheapo NiCad D-cells, which are just C-cells in a dummy case: they’re a meager 1.8 Ah. We’re talking 4 pounds of batteries here; if you get the wires crossed they can deliver a lot of amps. To avoid any involuntary spot-welding you need to put a fuse in line with the wire from the battery. We haven’t worked out a truly groovy battery pack holder yet; for now it’s just a funky plywood box.
At this point I became overconfident and tried to make a charger for the batteries myself. But with the acrid smell of burning plastic fresh in my nostrils, I would suggest that you just buy a commercial one. (In the end, mine does work OK.) One of Jeff’s Net-pals suggested the Powersonic PSC 12800A, about $33.
Halogen reflector lamps are the key to all this: they have an bright white filament and an efficient reflector. The size we used is called MR-11. I wanted to find a 12-watt (which would be bright but not a battery-killer), but it turns out that it’s much easier to find the 20 watt sizes. Oh well. That translates into about 2-1/4 hours of battery life.
These lamps are usually $9 or so, but I stumbled onto a bargain at the cavernous nearby Home Warehouse. It was a “medium flood” (a beam about 30 degrees wide) for $4. But hunt around for the style with a protective cover glass: any stray raindrop could crack the hot bulb. (We had to sacrifice a camcorder-style clear filter for a cover lens.)
You will almost certainly have trouble finding the “official” ceramic base for these lamps (try a large electrical supply), but if you take a look at all the little crimp connectors available at Radio Shack, perhaps something can be fudged to crimp wires onto the pins of the lamp. While you’re there, pick up 2 sets of connector plugs which will let you unplug the battery pack from the lamp and attach it to the charger. The plus wire of the charger must go to the plus of the battery or else you blow the fuse (or worse).
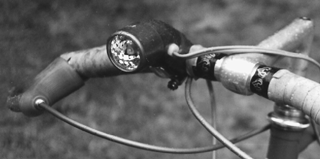
The quaint and peculiar aspect of our headlamp is the housing, made from 1-1/4″ copper plumbing fittings. (The lamp gets really hot, and copper is good at wicking heat away.) You can use whichever fitting suits your own baroque tendencies (cheapest is a piece of straight 1-1/4″ tubing), it just has to have one end that will accept a 1-1/4″-size end cap. Cut a hole into the end cap (to let the light out); this slips over the halogen lamp and holds it in place. To cut the hole (about 1-3/16″) you can drill a circle of little holes and then file the edge smooth.
Cut semicircles at the bottom of the fitting to fit against your handlebars. Then hacksaw two slots and thread a stainless steel hose clamp through them. I installed a switch, but you could also just unplug the battery pack. Silicone caulk is supposedly rated up to 400 degrees F, so I used that to seal the cover glass against the end cap, and provide some cushioning for the lamp. You can use a “Heyco” style strain-relief to bring the wires out through a hole in the copper, or just another blob of silicone. One small sheet-metal screw keeps the cap in place.
Incidentally, you do need to make sure that the wires inside the lamp aren’t going to melt and cause a short. (You can buy neoprene heater cord, designed for high temperatures.) With any halogen bulb, wipe off fingerprints using rubbing alcohol, or else it might shatter. The copper pipe fittings can get hot enough to burn you if you don’t keep your bike moving, creating a breeze. Oh, and don’t stare right into that bulb when it’s on…
The total cost of parts the way we did it was about $85. To be honest, if you took all of our time into account, you would have to say that some of those expensive bike-lights are not such an outrageous rip-off. They’re just, well, expensive. So if you would be down in the basement puttering away at some project anyway, build your own, pocket that hundred-dollar savings, and head out into the moonlight…
[Jeff: I finally took Ross’ light on a group mt-bike night ride. It was a thing of curvy coppery beauty amidst the black plastic blob-lights of the other riders. When I fired it up there was a hush. Homemade rig has power! In use, it took the jarring of hi-speed jammin without a hitch. Its beam swallowed up the beam of the rider in front of me. Their little spot would dance along the trail and I’d ride up and it’d be like turning on the living room lights. A wide, seamless wash of light. Which brings me to its only weak link: store-bought super-rigs throw a tight spot of light further down the trail. Our 30 degree bulb puts light to the sides which I’d rather have down the middle, even though it does cast a creamy beam up to 10 yards ahead. (There’s an MR-11 16 degree Spot bulb which I might test one of these days.) As for road riding, when cars pass me I notice how wimpy and broken-up their low beams are in comparison!]
Sources: All Electronics Corp. P.O. Box 567 Van Nuys CA 91408-0567 Orders: 1-800-826-5432 [General source for electronics parts]
